
Silicone 3D printing unlocks the door to innovation by enabling the creation of prototypes with unprecedented shapes, intricate details, and advanced mechanical properties. Discover the key stages of this groundbreaking process, from model design to achieving a functional prototype that meets expectations.
First Stage: Design and File Preparation for Silicone 3D Printing
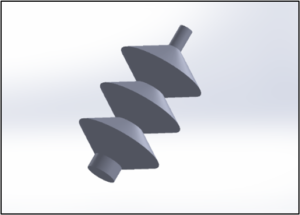
Preparing the 3D file stands as one of the pivotal stages in achieving your prototype. This stage determines the quality of the final result and the model’s suitability for successful printing. Here are some tips for preparing your file: consider 3D printing challenges during design, minimize supports, and optimize the shape if possible to utilize the vase function, etc.
-
Use suitable 3D design software.
We recommend using Computer-Aided Design and Manufacturing (CAD/CAM) software. The choice of software depends on the part to be printed.
- For industrial parts, we recommend: SolidWorks, Catia, Fusion 360,…
- For orthopedics, there are generalist software options like Geomagic Freeform, OrtenShape, specific design and correction software like Vytruve, Spentys or Cube or libraries allowing the processing and conversion of patient scans into printable devices.
Each of these solutions has its limitations for designing the final object. If you use scanning tools for your models, we strongly recommend verifying their quality. The reliability of your project depends on it.
-
Specify and verify the model:
To achieve a silicone prototype faithful to your design, the 3D model must be error-free. Check and correct any imperfections, such as geometry errors, unjoined faces, overlaps, or unclear elements (cleaning with Autodesk Meshmixer software).
-
Opt for adequate thickness:
Models intended for silicone 3D printing must have appropriate dimensions to ensure the strength and integrity of the prototype. Ensure that the walls are thick enough to be successfully printed and withstand mechanical constraints.
-
Add supports if necessary:
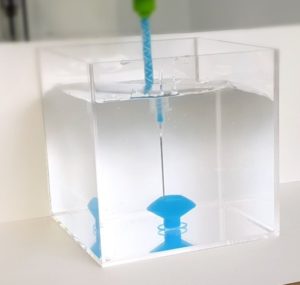
If your model includes overhanging parts or bridges, adding supports is necessary to ensure successful printing. Using printing within gel helps overcome some limitations of these supports by allowing gravity-free printing. However, it introduces other constraints such as gel entrapment, container usage, etc. At COP, we’ve developed COPSIL 3D® ADD GEL.
Through our experience, we’ve created a usage guide for this support gel: Design Guidelines: COPSIL 3D® ADD GEL
-
Position and orient the model correctly:
These elements can influence the print quality. Factors like stability, base surface, minimizing supports, etc., need consideration.
-
Export in a compatible format:
Nous recommandons l’export en STL ou OBJ. Ces formats sont largement pris en charge par les logiciels et les imprimantes 3D.Send us your project directly from our 3D Silicone Prototyping contact page or at contact@cop-chimie.
-
Use a slicer:
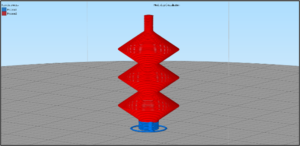
Using a slicer (slice-cutting software) converts the 3D model into a series of instructions describing each layer the printer must create. The software generates a G-code control file, which is the language understandable by the 3D printer. This file is then transferred to the printer to initiate the printing process.
Second stage : Printer Preparation and Print Settings for Optimal Quality
Once we receive the 3D file of the silicone prototype and define the print profile, we ensure precise calibration of the printer to achieve accurate and reliable results: properly aligned and calibrated axes, Z-offset calibration, compressed air pressure, mixing ratio of pumps supplying the liquid silicone, chamber temperature, and possibly the bed temperature.
Third stage : Printing the Silicone Prototype
During printing, we monitor the process to ensure proper silicone flow and homogeneous layer printing. Several trials are often necessary to achieve an optimal result.
Last stage: Post-processing of Silicone Prototypes
Once the prototype is printed, we examine and detect any imperfections or defects compared to the specifications. If necessary, we make adjustments to the print parameters or the model’s design to enhance the quality of your next silicone prototype. Assemblies between parts are also possible using Silicone Adhesive.
Post-processing your 3D silicone prototypes is viable to enhance the final piece’s quality. It improves the aesthetic appearance by smoothing rough surfaces, eliminating layer lines for a more uniform finish.
Post-processing your parts provides additional finish and protection by enhancing the durability of your prototype. We recommend using our flexible silicone coating, Soft Touch Silicone Coating SILISKIN + Powder.
By possessing knowledge of these materials and conducting the various stages of your prototype’s 3D printing, COP enables you to obtain a quality prototype faithful to your design and meeting your requirements.
Mastering the stages of silicone 3D printing prototyping is a crucial cornerstone in turning ideas into tangible reality. Each phase, from design to file preparation, printer calibration, actual printing, and finally post-processing, demands meticulous attention to yield high-quality prototypes. To expedite this process without compromising precision, explore practical tips in our article on executing your : How to Expedite Prototyping of Silicone Elastomer Projects with 3D Printing?
Commanding these steps not only ensures quality prototypes but also paves the way for agile and continuous innovation.


